As of January 2019, there are more than 1.94 billion websites. That’s a lot of competition. What’s one great way to stand out? Great images. In fact, vision dominates all other senses when it comes to interacting with and absorbing information.
Here are three quick facts to help you understand how critical images are for people (and for SEO):
- 90% of all the data the brain transmits is visual.
- The human brain processes one image in the same amount of time it would take to read 1000 words. (Yes, turns out the old adage is indeed rooted in scientific fact.)
- The recall value of visual content even after three days is 65%, whereas the recall value for written text is merely 10%.
With the majority of search volume coming from phones — and coupled with the fact that people’s attention spans have reduced to eight seconds — it’s essential for websites to be able to deliver a quick, frictionless, and delightful user experience.
Image optimization serves as a major part of this puzzle.
What can image optimization do for my users (and for SEO)?
- By shaving seconds off your site speed, it can reduce bounce rate and improve site retention.
- It helps improve page loading speed, which is a major Google ranking factor.
- It can help improve your keyword prominence. Read more on that here.
- It helps in reverse image search, which can be a big value add especially if you’re a product-based business.
- Many devices and desktops use high-resolution screens, which increase the need for good quality images.
Basic image optimization tips
These are some tips that anyone can apply for any type of site (even WordPress), so you’re not solely at the mercy of your developers and designers.
1. Choosing the right type of image: Vector or raster?
- Vector images are simple, created by using lines, points, and polygons. Vector images are best applicable for shapes, logos, icons, and flat images. They have as good as no pixelation when you zoom in, making them apt for high-resolution devices. Additionally, you can use the same image file on multiple platforms (as well as for responsive website design) without having to use multiple variations.
- Raster images, on the other hand, are images that are made of rectangular grids, each packed with multiple color values (pixels). Raster images provide depth to the imagery you would want to convey, giving it an emotional and psychological appeal as these images look real. However, if not handled well, these can heavily hamper your site’s loading speed! Plus, you might have to save multiple file variations to ensure they’re compatible on different platforms and fit for responsive designs.
Here’s a table that Google shared to help understand the pixel-to-byte relation. In short, you’ll get an idea of how heavy one image can get based on its dimensions.

Source: Google
Google also mentioned that it takes four bytes of memory to deliver one pixel. Imagine if you had several images on a site with 800 X 800 pixels. our site would take at least something around 625 kBps. Or in simpler terms, imagine an elephant participating in a rabbit race.
Bottom line
I would suggest wisely using a mix of both. An ideal ratio could be 40% vector images and 60% raster images.
2. Picking the best image format – SVG, JPG, PNG, or GIF?
Best format for vector images:
SVG is the only, and the best, option for vector images. Due to its flat imagery, you also benefit from high quality that is easily scalable.
Best formats for raster images:
- PNG: Produces high-quality images with heavy file sizes. It can be suggested only for times when you want to save every detail of the image.
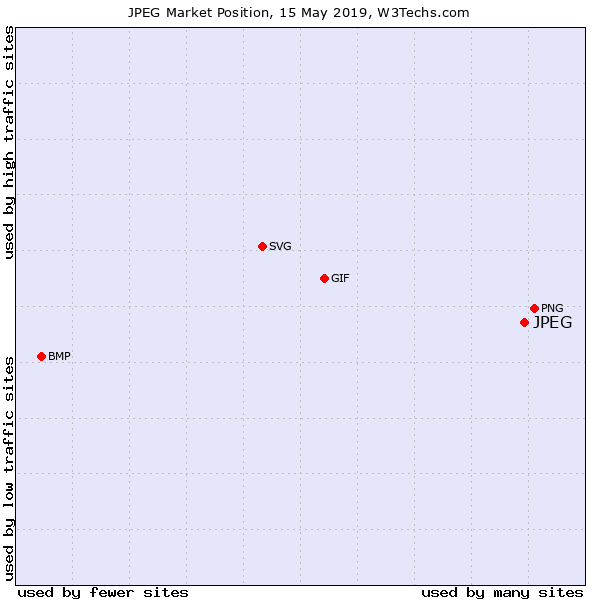
- JPG: Produces good quality images which aren’t heavy in terms of file size. However, these are lossy images, which means you’ll lose some minor image details permanently. JPG is undoubtedly the preferred image format, which gives you the convenience of hassle-free downloading and uploading of images. Because of this, they’re the most widely used — around 72.3% of websites use JPG image formats and most of the phones save images as “.JPG” files. They are especially suggested for ecommerce sites and social media.
- Gif: If you’re looking for animation, GIF is an ideal choice as it supports 256 different colors chosen from the 24-bit RGB color space. As of now, just 26.6% of websites use GIF formats.
Here’s a chart that could help you take a call on which image format is best to use.

Source: W3Techs
Note: The data in the above chart is of May 15, 2019
3. Resizing images
With a cloud full of devices it’s obvious why people get confused about ideal image sizes.
Note that image size and image file size are two different things. Here we’ll explain how you can get ideal image size (also called image dimensions).
As part of image dimensions, we’ll also discuss aspect ratios.
What’s an aspect ratio?
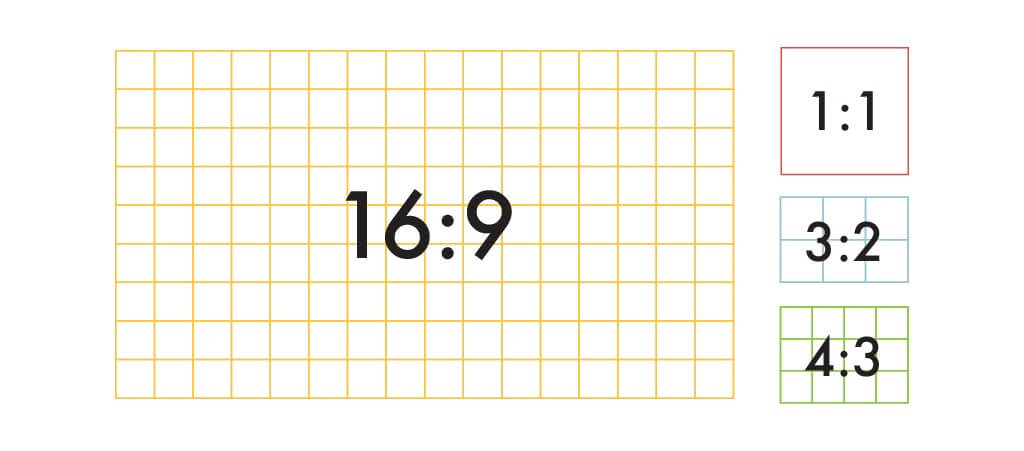
Aspect ratios tell the width and height of an image and are written in an “x:y” format.
Why is it important?
Remember the time when you tried scaling an image and literally blew it out of proportion? This is exactly what it saves you from. Referring to an image aspect ratio while cropping or resizing images helps you maintain the viability and beauty of the image’s dimensions.
You could refer to this image Shutterstock created to enlist some commonly used aspect ratios.

Source for the image and the table data: Shutterstock
| Aspect ratio | Typical dimensions (inches) | Typical dimensions (pixels) | Ideal for |
| 1:1 | 8 x 8 | 1080 x 1080 | Social media profile photos and mobile screens |
| 3:2 | 6 x 4 | 1080 x 720 | Photography and print |
| 4:3 | 8 x 6 | 1024 x 768 pixels | TVs, monitors, and digital cameras |
| 16:9 | 1920 x 1080 and 1280 x 720 | Presentations, monitors, and widescreen TVs |
With reference to the table above, it’s best to focus on the 1:1 and 4:3 image ratio that are apt for social media, mobile screens, photography, and print.
You might have your own dimension templates based on the content management system (CMS) you’re using.
According to Squarespace, the most ideal size for image optimization on a CMS is 1500 and 2500 pixels.
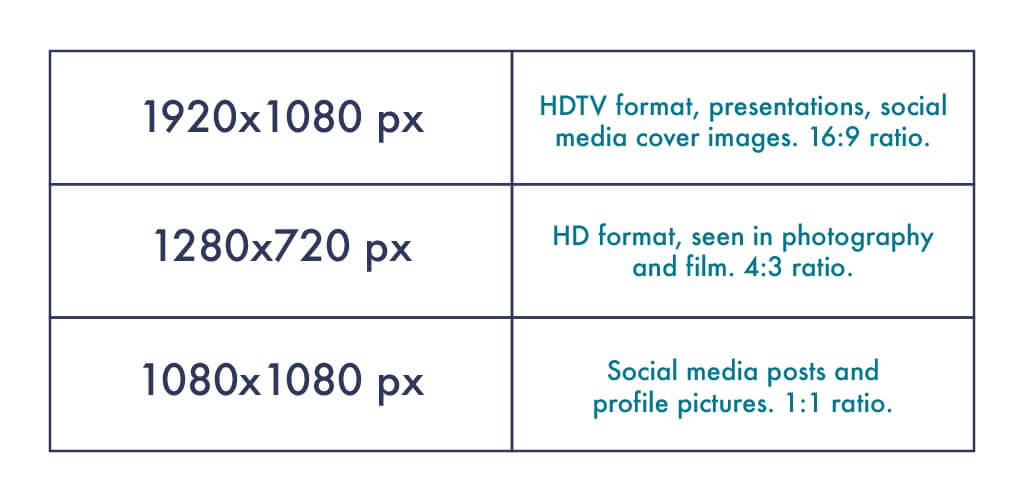
Here’s a quick and simple answer to spot the most common image sizes for the web.
 Source: Shutterstock
Bottom line
From personal observation, I can suggest using 1080 X 1080 pixels and 1500 X 2500 pixels.
If you’re feeling too lazy to go through all these details, you could also try scaling the image from the corner arrow while you’ve pressed the “Shift” key. Works for some platforms.
4. Naming images – Best practices
Search engines have brains without eyes, so unless you name your images right, they won’t be able to “read” your images nor rank you accordingly. This is where your keywords come into play. As I’ve mentioned above, if you name your images well, you can improve your keyword density and chances of ranking.
Let’s explain this with an example:
- How people commonly save images – “Haphazard/random numbers and alphabets”, “Flowers can dance”, and “What was I thinking”
- How people should save images – “five-tips-for-image-optimization” and “the-ideal-method-for-naming-images-in-2019”
Name your images in all small letters with hyphens in between and leave no spaces. As you’ve seen, I’ve used the keyword “image optimization” in the “five-tips-for-image-optimization” example. You’ll be surprised with how much that helps in ranking.
Bonus
You could also use the following to improve keyword usage in your site content:
- Alt text (If your image is loading slowly, this text appears in place of the image so users can get an idea of what should be there.)
- Captions (Text that gives a short description, helping users know more about the image.)
Plus, if you have an ecommerce site, you could even make good use of structured data to give the search engine more specific details about your products’ color, type, size, and a lot more.
5. Compressing the byte size of the image files
Compressing a file is possibly the simplest yet the most crucial part of image optimization as it directly relates to the website’s loading time. Points one to four prepare you for this final stage of image optimization.
Two live examples of how much load time can cost your bottom line:
- Amazon.com observed a one percent decrease in sales for every 100-ms increase in the page load time.
- Google experienced a 20 percent drop in revenue for every 500-ms increase in the search results’ display time.
What’s the ideal image file size?
A file size below 70 kb is what you should be targeting. In case of heavy files closer to 300 kb, the best you can achieve is a 100 kb file size. Doing so saves your images from taking extra milliseconds to load while it gives you lossy, compressed images that do not compromise the visual quality.
How can you decrease an image’s file size?
All you need to do is drop these files on a file compression site and you’re all set. These are some good, free image file compression online tools:
- TinyPNG/TinyJPG – (Compresses .png and .jpg files – 135 kb reduced to 43.9 kb – Does up to 20 images at a time – Supports dropbox)
- Image optimizer – (Compresses .png and .jpg files – 135 kb reduced to 49 kb – Only does 1 file at a time)
- WeCompress – (Compresses .png, .jpg, and other files – 135 kb reduced to 48 kb – Only does 1 file at a time)
- EzGif – (Compresses .gif and other files – 2MiB reduced to 1.77MiB – Only does 1 file at a time. It also lets you edit the gif before compressing it.)
Bonus tips
- Use web fonts in place of images with text on them as they look better, do not need to be scaled with the image, take less space, and save loading time.
- Use 72dpi resolution for your images.
Closing notes
You could be using all these image optimization tips and still get stuck with a site that loads in 13 seconds or even worse. This is when you might want to ask yourself:
- Do I need all these images?
- Which images are redundant?
- What’s the best place to put images on the site?
Website content, both visual and written, has an intertwined relationship that stimulates emotions and inspires people to further engage with your product or service. People (or at least I) judge a business through its website so feel free to tell us, which was the last impressive website you visited? Or what have you done for image optimization?
Related reading
GDS, a free dashboard-style reporting tool launched in June 2016 allows data import from over 100 third-party sources. Updates listed with screenshots.
Mobile users are most likely using Google to search for local businesses, and those searches are generally limited to what’s called the “Local 3-Pack.” How can enterprises optimize their local SEO?
Are high DA sites always a good fit for your content? Our study found a link between DA and the response types we received from writers at these publishers.


